CapCut advanced usage tips: detailed explanation of intelligent image cutout and high-quality export settings
May 14, 2026
What are the advanced usage techniques for CapCut? This article provides a detailed introduction to the core differences between CapCut and Jianying, advanced features such as intelligent cutout/keyframe animation/speed curve adjustment, subtitle generation translation, and high-quality export settings. It is suitable for video creators who need to create overseas short videos as a reference, and comprehensively improves video production efficiency.
What is the difference between CapCut and Jianying?
1. Market positioning: CapCut is oriented to the global market (overseas TikTok ecology), and cut to the Chinese Mainland market; CapCut supports multiple language interfaces, while Jianying mainly has a Chinese interface, targeting completely different user groups.
2. Music library difference: CapCut uses TikTok overseas copyright music library, while Clipping uses domestic music copyright (Tiktok/byte domestic copyright); The music libraries of the two platforms are completely incompatible, and overseas creators need CapCut to use background music in compliance.
3. Template market: CapCut's templates market is aimed at overseas users' aesthetics, including a large number of European and American style templates; Jianying templates are more in line with the preferences of Chinese users, such as antique style and e-commerce sales.
4. Social sharing: CapCut deeply integrates TikTok accounts and allows direct posting to TikTok; Clipping is deeply integrated with Tiktok/Kwai, and the release process is optimized for domestic platforms.
5. Data synchronization: The account data of the two apps are not interconnected, and overseas and domestic materials need to be managed separately. It is recommended to use different accounts to operate them separately.
How does CapCut create popular short videos?
1. Make good use of CapCut templates: Open the CapCut homepage and click on "Templates" to browse popular template categories; Use keyword searches (such as' vlog ',' travel ',' food ') to quickly find relevant templates; After selecting a template, click 'Use Template' to start editing.
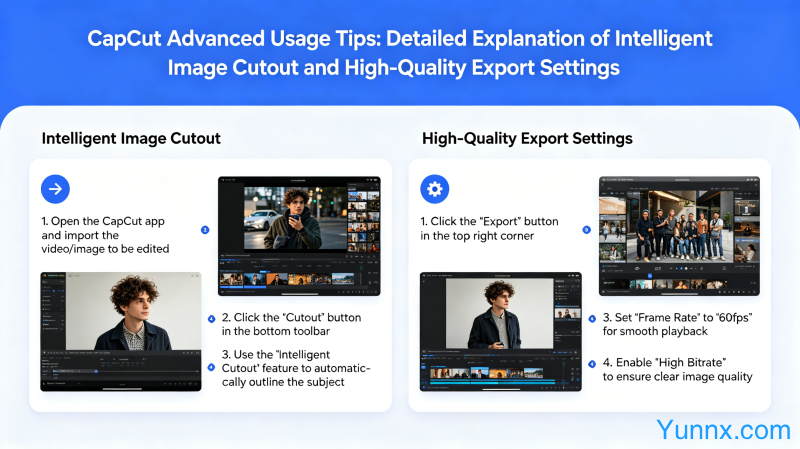
2. Intelligent image segmentation technique: Click on the video track → Click on "AI" → Select "Remove Background" or "Isolate Subject"; After cutout, a new background layer can be added to achieve creative effects; It is recommended to manually adjust the edge treatment of details such as hair strands to ensure natural edges.
3. Keyframe animation: Click on the element to add animation ->click on "Animate" ->select the preset animation; Dragging animation keyframes to the desired duration position on the timeline can precisely control the animation rhythm.
4. Speed curve adjustment: Select the video clip ->click "Speed" ->select "Curve"; CapCut provides various speed curve templates such as "Hero", "Slow Motion", "Acceleration", etc; Custom curves can manually add keyframes to adjust speed and achieve creative variable speed effects.
How to add subtitles and translations to CapCut?
1. Automatic subtitle generation: Click on the video track ->click on "Captions" ->select "Auto captions"; After selecting the language, wait for AI to generate subtitles; After generation, click edit to manually correct spelling errors and improve subtitle accuracy.
2. Subtitle style adjustment: Double click the subtitle track to enter style editing; You can modify the font, color, size, and stroke; It is recommended to use a combination of white font and black strokes to ensure good readability in various backgrounds.
3. Subtitle translation: Click on the subtitle track ->click on "Translate" ->select the target language; AI will automatically translate and generate corresponding subtitle tracks; It is recommended to manually correct professional terminology and oral expressions after translation to ensure a natural and smooth translation.
4. Dynamic subtitle effect: Select the subtitle ->click "Style" ->choose a subtitle style with animation effect; Common effects include typewriter effects (appearing word for word) and zoom fade in effects (fading in from large to small).
How does CapCut export high-quality videos?
1. Export settings optimization: Click on "Export" in the upper right corner ->select 1080P or 4K resolution in the export settings; It is recommended to choose a frame rate of 30fps or 60fps (60fps for high-speed motion content); Choose 'High' or 'Ultra' bitrate for optimal image quality.
2. Format selection: MP4 format has the best compatibility and is suitable for the vast majority of scenarios; MOV format has higher image quality but larger file size, recommended for editing; The transparent channel (used for overlay effects) requires the selection of ProRes 422 format.
3. Directly publish to TikTok: When exporting, select "Share to TikTok" to publish directly, skipping the step of saving locally and then uploading; You can also add TikTok exclusive tags and descriptions directly on the publishing page.
4. Common export issues: Stuck at 99%, usually due to network problems. Try changing WiFi or using mobile data; After exporting, if the color becomes lighter, it is necessary to check whether the "Enhance Brightness" option is enabled, which may cause overexposure.
Recommend Apps


